How to make your own potions
Are you eager to dive into the world of potion brewing? Fantastic! But where do you begin? Let me guide you through the process and share my secret recipes. As a potionmaker myself, I totally get the eagerness to create some potions of your own! But if you feel like you find it too much work, don't worry we sell them!
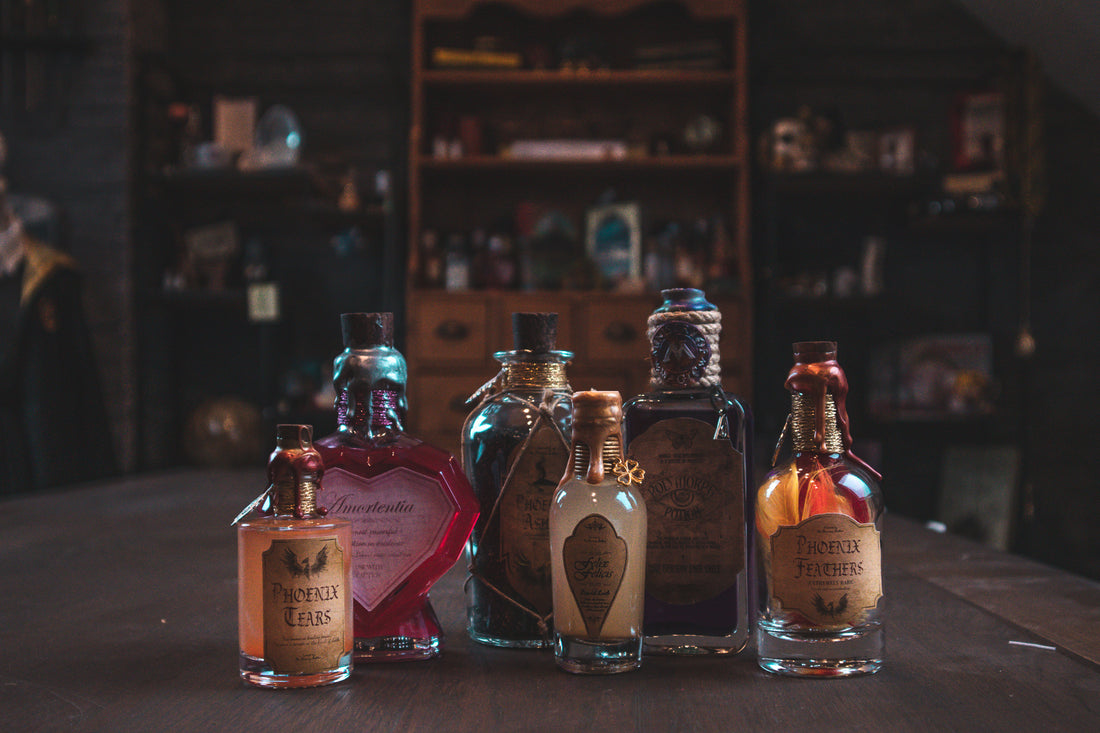
First and foremost, determine the type of potion you want to create. Will it be a Draught of Living Death or an Armortentia potion? Consider the bottle you'll use and the substance that will fill it. Is it water, blood, or something plant-based? Capture every detail in your sketch, including the shape of the label and the type of paper you prefer.
Once you have your ideas sketched out, it's time to go shopping! Visit local craft stores to gather supplies like deco materials, paints, sticker paper, or craft paper. If you're looking for unique elements like wax or charms, online platforms such as Amazon and AliExpress offer a magical array of options. However, if you prefer convenience over patience, webshops are available as well, albeit at a higher cost.
WHAT KIND OF GLASSWORK?
 Now, let's talk about the glasswork. I recommend selecting a bottle between 50-250/300 mL to strike a balance between weight and size. Consider the shape of the bottle based on the contents you've planned. For instance, avoid short bottles when using big feathers or huge bottles for a potion that should be described as rare. Pay attention to the size of the bottle's bottom, as smaller bottoms may cause powders or color-changing substances to stick to the sides, affecting the appearance.
The content of your potion can also decide the shape, don't get a very short and small bottle when you want to use big feathers! A Felix Felicis is described as very rare, using a huge bottle might take away from that rarity. ( I did broke that rule with my 200ml Acromantula Venom bottle oops).
Also the powder you use for colourchanging sticks to the sides of a bottle when the bottle is smaller on the bottom. This is something to keep in mind, because it will look like the original colour has already some of that pigment from the colour change in it.
Overall I recommend going to the local craft stores or thrift stores and look for a fun bottle that fits your idea and is good to label. Don't use very round bottles if you want to use a label that sticked onto the bottle, because it will wrinkle and look ugly.
HOW TO DESIGN
Designing a potion is quite a challenge! When you are waiting for your supplies to come in, you can already try to design a label. If you don't have your bottle yet, then I recommend trying to get a rough shape and focus on what will be on the label, scale and size can always be changed later. If you are not great at designing I recommend Canva to help you design and get some free elements to decorate your design. Or if you want to use some pre-designed labels, I sell some as well! Shop labels here. If you have Adobe programs like me, this is of course not necessary. But sometimes you can find some cool elements there to use in your labels! Always use copyright free material! Respect an artist!
After you have designed your labels, I recommend printing them out with a LaserJet printer, to prevent the ink from running once it gets wet (inkjet is not waterproof). I use a cutting machine (Silhouette Cameo 4) to cut out my labels and sometimes some other details. This allows you to be more detailed and less afraid about making mistakes while cutting them by hand! And allow you to emboss, foil and do other stuff with your labels!
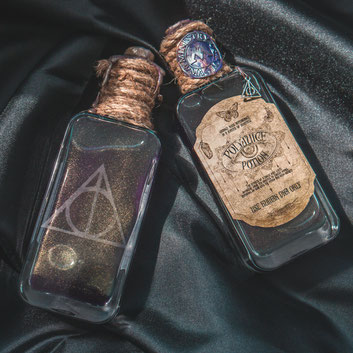
Sometimes it's really cool to etch your glass! You can cut out patterns by hand with a knife or with a cutting machine, use vinyl and stick it onto the glass. This gives you an awesome and unique touch! I did that with the Polyjuice Potion on the back!
I also sell my labels to print out yourself!
FILL HER UP!
So you have your supplies, you have your complete idea sketched out! Now it's time to think about the content of the bottle/jar.
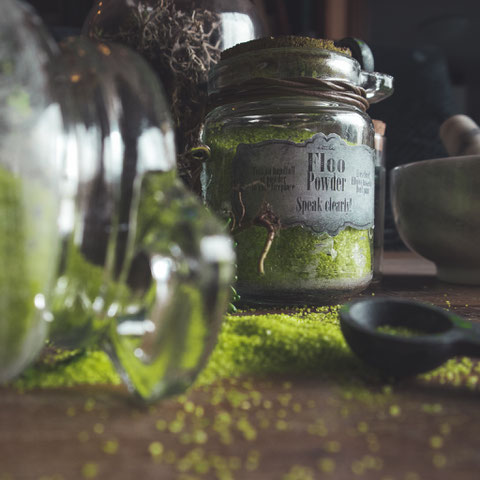
Powders / Sand
So you really want to have a more powdery or sand-like potion! That's really cool! You can use Aquarium sand as content, this is often for sale in big numbers and a lot cheaper then deco sand! (And tbh it's all the same). To create more of a sand look 1mm grains are perfect. If you want more powdery sand, then maybe make it powdery yourself by crucnhing it? Or google around. But real powders are hard to work with and hard to get in big amounts! They will stick the glass and it will go everywhere once you breath to close to it.
Liquid
To make a more classical potion look and to make sure it won't discolour in the sun, I use special Alcohol or Ecolinq dyes. This way it won't slowly dissolve, also always make sure to seal them airtight. You only need a few drops so a little goes a long way. To make it colour changing, add some Mica Powder to it and shake it up! I'll elaborate more on making this colour changing in another blog!
Plants
When working with a plant based content, it's important to use fake plants or seal it airtight and make sure that it can't rot. I personally just use fake plants, these are risk free and also look great!
Blood
When you want to create a more bloody texture, I recommend getting corn syrup or a thick oil. I find this at my local Toko, but they can also be ordered online. Corn syrup is super thick and can be diluted with a little bit of water. Don't use to much or it will dissolve. Just add your powder or dye to it and it will become the colour! Mix it well and use a piping bag or a funnel to fill your bottle neatly.
HOW TO DECORATE
Your supplies came in! That's great! now it's time to decorate your potions! I recommend using a good glue for this stuff, especially when they are colour-changing because then you can shake them without damaging your design. I will discuss colour changing potions in another post! When decorating, keep in mind if you want the bottle already filled up or not. Sometimes the bottle will get hot and then the consistency of the content will change, so keep that in mind when decorating. You can use a 3D printer like I used for my Acromantula Venom and my Occamy Eggs. Or you can sculpt things yourself with clay!
Wax
When it comes to decorating, use a reliable glue that won't damage your design, especially for color-changing potions that require shaking. Incorporate wax to add an authentic touch, but be cautious to avoid burning yourself. Wax beads and glue sticks serve different purposes, with beads being suitable for smaller details like seals. Planning ahead and ordering beads from platforms like AliExpress can help manage costs.
Also when you want to do a lot of potions at once, I recommend getting a soldering pot. This is a little cauldron basically for you beads and make it easier to melt a lot at once. Otherwise is a tea light enough with a special wax spoon. Get yourself some nice wax stamps and stamp away! Also just dripping some wax around the cork is also fun and beautiful!
TIP: Keep a tray with ice cubes near to cool down your wax stamp in between, otherwise it will take a long time for it to dry
Charms
A charm is always cute to use and can be found on a lot potions. It's fun to find one that relates to the theme of your potion, a liquid luck needs a clover! Finding the right charm is a bit of a challenge but it can really upgrade your potion look! Make sure to get some nice rope or leather to attach the charm onto your potion. You can hang down a charm like with the Polyjuice Potion or attach it to the neck like with the Felix Felicis!
TIP: take note on how big the hoop of you charm is, some ropes are too thick too pull through them, this way you won't have to change your design last minute!
Unique Details
Every potion has it's unique features and don't be afraid to step out of your comfort zone! Look at my Draught of Living Death! IT HAS CHAINS! I never thought that I would add chains to a potion but it worked and you know what, it looks great! So when you are walking around in the craft store, don't back away from some funny looking material, but bring it with you! It will make your potion stand out!